
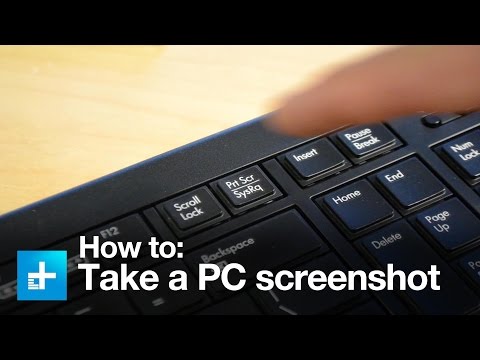
Once installed, ShareX will work with the default screenshot hotkeys in Windows. The simplest way to take a screenshot is to press the Print Screen key on your keyboard, which is usually abbreviated as PrtSc. This will save what’s displayed on your PC screen inside the clipboard. If you’re using a laptop, you may need to press Fn + PrtSc to get the same result. If you need more elaborate ways to capture screenshots, you can also install Windows-compatible third-party apps with more offerings than Windows apps.
- When using the bootable USB drive to perform Windows 11 update, you may receive the error message “This PC can’t run Windows 11”.
- Actually, there is such an abundance of Windows 10 screenshot tools that you can easily feel overwhelmed when you try to pick just one.
- I did my upgrade on a fresh Windows 10 machine, and the upgrade went off without a hitch.
- You need to wait for some time until this code connects you to the KMS server and then it will be activated automatically.
By default, when you create an account, whether a local or Microsoft account, it will automatically be a Standard account. I don’t recommend changing Cloud PC computer name properties because it’s not a supported scenario . This is applicable for both Azure AD joined, and Hybrid Azure AD Joined Cloud PCs. However, there are several supported methods to change the Display Name of the Windows 365 Cloud PC.
Protected and productive
The screen capture shortcut can be changed by entering the global hotkey below the Capture button. You can grab the entire desktop screen, a window, or a region with Snagit’s All-in-One Capture. It also allows you to take a quick snapshot or even record a video. You can save captured screenshots by pressing Ctrl + S. If you are taking screenshots on a computer or a laptop, then you are not just limited to use the Print Screen key.
You get the full-fledged development experience you know and love in VS Code, no matter where your code is hosted. You’ll then see a notification that the “VS Code Server” is initializing on the SSH Host. Once the VS Code Server is installed on the remote host, it can run extensions and talk to your local instance of VS Code. As long as your Linux VM supports SSH, it can be hosted anywhere; on your local host, on premise, in Azure, or in any other cloud. You can also be on any client – Windows, macOS, or Linux.
Product Services
Here’s how to change your password in Windows 11. Click Sign out and finish to return to your profile, where you can add an account picture to the local account. In the Your account settings pane, click Sign in with a local account instead. Click the account you want to modify, to display your options.
How to Take Screenshot using Snipping Tool
Right-click again in the empty white space inside LabConfig and select DWORD (32-bit) Value from the New option. This will disable the TPM check, but you need to create another entry here for the Secure Boot check. While LabConfig is selected, right-click on an empty space in the right panel and select DWORD (32-bit) Value from the New option. Now go ahead and install Windows 11 using a bootable USB or mounted ISO. While the MoSetup folder is selected, right-click on the empty white space in the right panel and select DWORD (32-bit) Value from the New option. First, you need to access the BIOS, which you can do so by repeatedly pressing the F10, F2, F12, F1, or DEL key while the PC is starting.
You can use them to send a shot of a strange error www.driversol.com message to your company’s IT department. And you can use them to capture tweets before they disappear into the black hole of deletion. So, in case you need to capture a screenshot or two, here’s a quick and simple guide to taking screenshots on your PC.
The next time you log in, we will prefill your username and you only need to enter your password to log in. After you gain access to your router’s firmware, you’ll be free to change whatever elements you think should be modified. These include the router name and password, the security level, and the Wi-Fi password. You can also set up parental controls, create a guest network, and manage attached devices. Just remember to apply any changes before you move on to the next screen.